After you install your Disc Stakka, getting started is quick and easy. Simply insert a 12 cm disc into a Disc Stakka unit and let the OpdiTracker software lead you though the steps required to store the disc's details. Once your discs are stored, the OpdiTracker software enables you to find and eject any disc within seconds.
The following are the three most common tasks you will perform when using your Disc Stakka:
· Store a disc in the Disc Stakka
· Return a disc to the Disc Stakka
Use the online help Contents or Index (to the left of this topic) to get detailed information about these and other Disc Stakka operations.
Your Disc Stakka can store, protect, and retrieve all of your 12 cm optical discs, including data CDs, DVDs, music and game discs.
1.
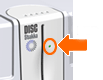
![]() Make
sure that the OpdiTracker software is running, and that the LED next to the Disc
Stakka gate is steadily lit. This indicates that the OpdiTracker software is
running and the Disc Stakka is ready to accept discs.
Make
sure that the OpdiTracker software is running, and that the LED next to the Disc
Stakka gate is steadily lit. This indicates that the OpdiTracker software is
running and the Disc Stakka is ready to accept discs.
2. Gently place your disc into the Disc Stakka gate. It does not matter which way the disc is facing.
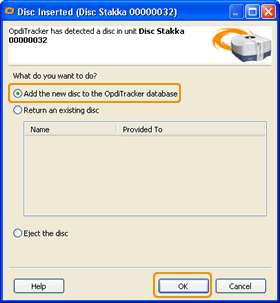
When the Disc Stakka senses the disc, it grasps it and pulls it into the unit. The OpdiTracker software then displays the Disc Inserted dialog box (shown below), which asks what you want to do with the inserted disc.
![]()
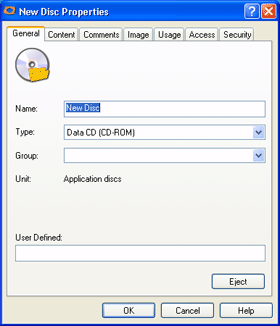
3. Make sure Add the new disc to the OpdiTracker database is selected, and then click OK to display the Disc Properties dialog box.
4. Record a description of the disc, and then click OK to save the disc's details to the OpdiTracker database.
![]() Tip:
Additional information about storing discs in your Disc Stakka is available in
the following topics: Adding a single disc, Adding multiple discs (bulk
loading), and Capturing a disc's contents.
Tip:
Additional information about storing discs in your Disc Stakka is available in
the following topics: Adding a single disc, Adding multiple discs (bulk
loading), and Capturing a disc's contents.
The OpdiTracker software enables you to find and eject any disc within seconds.
1.
![]() Right-click
the OpdiTracker icon from the taskbar, and then click Search to open the
OpdiTracker Search window (shown below).
Right-click
the OpdiTracker icon from the taskbar, and then click Search to open the
OpdiTracker Search window (shown below).
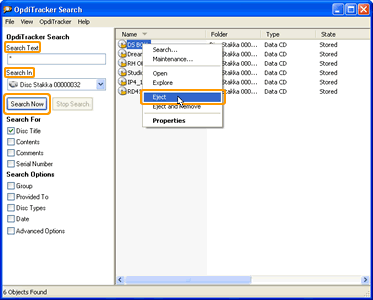
2. In the Search Text field, type the text that you want to locate in the OpdiTracker database, for example a disc name or file name.
3. Select the Disc Stakka unit that you want to search. If you like, refine your search by selecting the appropriate search options.
4. Click the Search Now button to start the search. When the search is complete, the results are displayed in the right side of the Search window.
5. Right-click a disc in the search results, and then click Eject.
![]() Tip:
Additional information about searching for and ejecting discs is available in
the following topics: Searching for a disc or file, Search tips, and Ejecting a
disc.
Tip:
Additional information about searching for and ejecting discs is available in
the following topics: Searching for a disc or file, Search tips, and Ejecting a
disc.
You can return a disc to any Disc Stakka unit attached to your computer. You do not need to return discs to the unit that they were ejected from.
1. Make sure the LED next to the Disc Stakka gate is steadily lit.
2. Gently place your disc into the Disc Stakka gate. It does not matter which way the disc is facing.
When the Disc Stakka senses the disc, it grasps it and pulls it into the unit. The OpdiTracker software then displays the Disc Inserted dialog box (shown below), which asks what you want to do with the inserted disc and shows a list of all discs recorded in the OpdiTracker database that are not currently stored in a Disc Stakka unit.
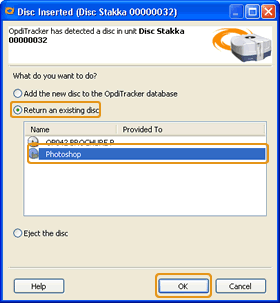
3. Make sure Return an existing disc is selected, and then click the name of the disc you are inserting followed by OK. Or you can simply double-click the disc name.
![]() Tip:
Additional information about returning discs to your Disc Stakka is available in
the following topic: Inserting or re-inserting a disc.
Tip:
Additional information about returning discs to your Disc Stakka is available in
the following topic: Inserting or re-inserting a disc.